A percolation test, sometimes referred to as a “Perc Test,” should be the first step to checking an area will be suitable for installing a soakaway or drainage field.
It may sound like a big or complicated thing to do, but all it is a hole in the ground in which you fill with water and measure the time it takes to soak into the surrounding ground.
That’s the percolation (soaking into the soil) and test (seeing how long it takes) in one.
Whilst carrying out the test, you will also be able to assess the ground itself, such as if clay is present, how difficult it is to dig in the area and other factors.
At the end of the test, if the rate at which the soil absorbs the water is quick enough, you can move forward with your soakaway or drainage field design. This will make any regulatory bodies, designers and engineers involved very happy, or you if it’s your property the test is for.
On this note, it’s important to not just measure the results, but write them down and take photos for future reference.
If you’re carrying out a percolation test for a waste water system such as drainage field or septic system, it cannot be overstated how important it is to make sure you are compliant as installing a system without proper testing could lead to not only an environmental impact on the local groundwater (contamination) but could simply mean your new system does not work. This is vital whether for commercial or private works, even if you’re doing it yourself as a DIY project.
If the soil composition varies significantly in the affected area, you may need to carry out several tests over a wide space.
How a percolation test goes could determine the size and type of soakaway you need, to make sure it can take expected daily waste water flowing into it, or rainwater from dizzle to stormy weather.
So now we can see why a percolation test is an important step in planning for effective, sustainable waste or rain water management for any project of this type, let’s move on.
Objectives of a Percolation Test
Depending on your intended drain system, a percolation test serves several critical objectives in the planning and implementation of effective drainage of wastewater treatment systems or rainwater. These objectives ensure that the design and functioning of septic systems or soakaways are optimised for specific site conditions.
Below are the primary objectives of a percolation test:
Assessing Soil Absorption Capacity:
The primary objective of a percolation test is to evaluate the rate at which the soil on a site can absorb water.
This assessment is crucial for the design of septic tanks and soakaways because it influences how quickly and effectively wastewater can be filtered through the soil and away from the system. A soil with good absorption properties ensures that wastewater disperses without pooling or causing surface runoff, thereby preventing system overload and potential failures.
Determining Soil Suitability for Septic Systems:
Not all soils are suitable for septic systems. Soils with high clay content, for example, may impede water flow, while sandy soils might filter water too quickly, reducing treatment efficacy. The percolation test helps determine whether the soil has the right balance of properties to support a septic system or if alternative wastewater treatment solutions are needed. This determination is essential to prevent system inefficiencies that could lead to environmental pollution.
Ensuring Environmental Safety and Regulatory Compliance:
By assessing the percolation rate of the soil, the test plays a crucial role in environmental protection. It ensures that the septic system or soakaway is capable of handling the effluent without contaminating groundwater or surrounding land areas. Moreover, percolation test results are often required by local health departments and environmental agencies to comply with building codes and regulations. Compliance with these regulations not only protects public health but also helps maintain the ecological balance of the area.
Overall, a percolation test is a foundational step in the responsible management of wastewater, particularly in areas not serviced by municipal sewage systems. Its objectives align with ensuring that development projects are sustainable, safe, and in harmony with local environmental standards.
Legal and Environmental Considerations
Before conducting a percolation test, it is crucial to understand and adhere to the local regulations and obtain the necessary permissions. This ensures that the installation of any septic system or soakaway complies with legal standards and is suitable for the specific environmental conditions of the area.
Local Regulations and Permissions
Permit Requirements:
In most regions, conducting a percolation test requires a permit from local health departments or environmental protection agencies. The process typically involves submitting a detailed plan of the proposed site and its intended sewage treatment solution. These permits ensure that the methods and parameters of the percolation test meet the prescribed standards and that the results will be recognised as valid by local authorities.
Installing a soakaway purely for taking rainwater does not typically require planning permission unless part of a larger development or refurbishment, but under Building Regulations Part H, careful consideration must be taken to not affect the property or neighbouring properties and infrastructure. You can easily work out how to adhere to by following our Soakaway Guide.
Standards and Guidelines:
Local regulations may dictate specific standards regarding the depth, duration, and frequency of the water absorption tests, as well as the acceptable percolation rates for installing a septic system. These standards are often based on the local soil types, water table levels, and environmental sensitivity of the area.
Professional Conduct:
For larger projects, a qualified professional who has been certified or licensed by relevant authorities should be instructed to carry out the percolation test. This requirement ensures that the test is performed accurately and responsibly, adhering to the technical and safety standards. If you carry out the works as a DIY job or as a local contractor, it’s still worth recording your findings and show you’ve taken all reasonable steps to comply with building regulations.
Environmental Considerations
Preventing Contamination:
The design and location of a septic system or soakaway must minimize the risk of contaminating soil and groundwater. A thorough percolation test helps identify the most suitable area for wastewater treatment, reducing the potential for effluent to reach and pollute nearby water bodies.
As for rainwater soakaways, the priority is determining if the surrounding ground can cope with the amount of rain or storm water you’re adding to it in this area, but make sure you try to prevent contaminants from entering even if you’re not dealing with waste or foul water.
For example, sometimes sink waste pipes can be configured to run into rain water gullies (through ignorance or carelessness) and this can introduce food waste and fats, oils and grease into the soakaway, not only contaminating the ground and possibly local watercourses, but also shortens the lifespan of the soakaway by clogging the gaps in the gravel, soil or membrane depending on the type of the soakaway involved.
Another potential source of contaminants is from rain water drains such as road gullies or channel drainage on drives and roads. This can store and send particulates from vehicles, from fumes to oil spills to wash-off from washing cars. This may require you to change tactics and send this section of your rainwater system to the nearest foul drain, or install some kind of interceptor to separate and remove the contaminants, both heavy and light.
Site-Specific Suitability:
Every site has unique environmental characteristics that must be considered. Factors like proximity to water sources, types of nearby vegetation, and typical weather patterns play significant roles in determining the appropriate type of wastewater system. The percolation test contributes essential data to this analysis, guiding environmentally sound decision-making.
Long-Term Sustainability:
Beyond immediate contamination risks, the test also considers the long-term impact of a septic system on the local environment. Ensuring that the soil can sustainably handle the effluent over time is critical to preventing future ecological degradation.
Understanding and integrating these legal and environmental considerations are essential not only for compliance and avoiding legal repercussions but also for promoting responsible environmental stewardship and community health.
Preparing for the Test
Proper preparation is crucial for conducting an accurate percolation test. This includes selecting an appropriate site, considering the optimal timing for the test, and gathering all necessary tools and materials. Here’s how to ensure each of these aspects is addressed effectively:
Selecting the Test Site
Representative Sampling:
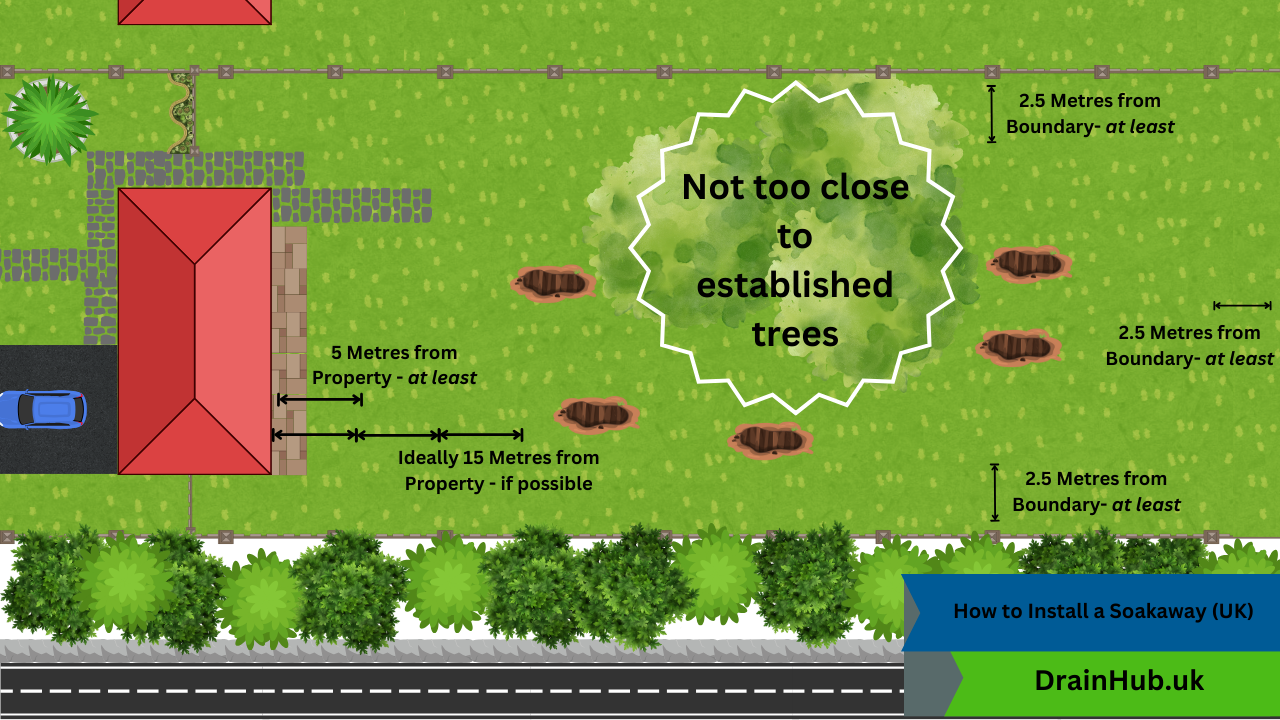
Choose a test site that accurately represents the area where the septic system or soakaway will be installed. Avoid areas near trees, large rocks, or previous soil disturbances that might skew results.
Accessibility:
Ensure the site is easily accessible for digging and bringing in equipment without causing significant disruption to the surrounding environment.
Timing Considerations
Soil Conditions:
The test should not be performed on recently disturbed soil as it may not provide accurate absorption rates. Allow any recently moved soil to settle or select a different testing location.
Weather Impact:
Avoid conducting the test in extremely wet conditions or during periods of heavy rain, as saturated soil can result in misleading absorption rates. Conversely, excessively dry conditions can also skew results, making the soil appear less permeable than under normal conditions.
Tools and Materials Needed
Item
Description
Quantity
Notes
Soil auger or post-hole digger
Tool for digging test holes
1
Measuring tape
For measuring depth and water drop
1
Water supply (hose or buckets)
Source of water for filling holes
–
Ensure adequate supply
Stopwatch or timer
For timing the seepage rate
1
Ruler or yardstick
For measuring water level
1
Preferably with mm measurement
Permeable membrane
To line the bottom of the hole, if required
As needed
Optional, used to prevent sediment disturbance
Each tool and material listed plays a crucial role in conducting the percolation test accurately. The soil auger or post-hole digger is used to create uniformly sized holes at the required depth, ensuring consistency across tests. The measuring tools and water supply are essential for setting up and monitoring the test, while the stopwatch or timer is critical for measuring the rate at which water percolates through the soil.
By meticulously preparing for the percolation test and ensuring all considerations are met, you can significantly enhance the reliability of the results, providing a solid foundation for the subsequent design and installation of septic systems or soakaways.
You may find it necessary to use a small excavator to get through tough terrain, it’s just a matter of working out time against budget; a machine will incur rental costs, assuming you don’t own one, but will quickly make the hole deep enough to test with whereas manual labour may be cheaper but will likely take longer. It also depends on the space and access you have, and should be considered in the planning stage.
Conducting a percolation test involves careful preparation and execution to ensure accurate results. Below is a detailed guide that outlines the key phases of the process.
Site Selection and Hole Preparation
Criteria for Selecting a Site:
Distance from Buildings:
Choose a location at least 30 feet away from any building foundations to prevent interference from existing structures.
Vegetation:
Avoid areas directly beneath trees or large shrubs where roots can affect soil structure and water absorption.
Topography:
Select a relatively flat area to avoid skewed results from runoff or pooling water.
Digging the Holes:
Use a soil auger or post-hole digger to dig holes of about 6 to 12 inches in diameter and typically 24 to 36 inches deep, depending on local regulations.
Space holes at least 4 to 6 feet apart from one another to ensure that the water absorption of one hole does not influence another.
Clear any loose debris from the bottom of the hole to maintain consistent soil conditions.
Pre-Soaking the Holes
Reasons for Pre-Soaking:
Soil Saturation: Pre-soaking helps to mimic the conditions under which a functional septic system would operate, providing a more accurate measurement of soil absorption capacity in a “wet” state.
Compaction Reduction: It allows any compacted soil disturbed during digging to settle and approach its natural state.
Method for Pre-Soaking:
Fill each hole with water to a prescribed depth, usually around 12 to 24 inches.
Allow the water to seep away completely, then refill to the same level. The pre-soaking period typically lasts 24 hours, although this can vary based on soil type and local guidelines.
Maintain water levels within the holes during this period to ensure consistent saturation.
Conducting the Test
Filling the Holes:
After the pre-soaking period, refill each hole with water to the initial test level, ensuring consistency across all test holes.
Measuring the Water Drop:
Measure the initial water level using a ruler or yardstick marked in millimeters or inches.
At regular intervals (typically every 30 minutes), measure and record the drop in water level. Continue this process until a consistent drop per time interval is observed, which may take several hours.
Calculating the Percolation Rate:
You can skip the tedious maths by using our free percolation test calculator below. It’s a good idea though to just run through the formula yourself so you understand the why it’s measured this way.
Use the recorded data to calculate the average rate of water drop per unit of time.
The percolation rate is typically calculated using the formula:Percolation Rate (in/min or in/hr)=Change in Water Level (inches)Time (minutes or hours)Percolation Rate (in/min or in/hr)=Time (minutes or hours)Change in Water Level (inches)
Report this rate in minutes per inch or seconds per inch, as commonly required by local regulations.
Percolation Test Calculator
Percolation Test Calculator
By following these detailed steps, you can accurately assess the percolation characteristics of the site’s soil, which is crucial for the design and implementation of effective and environmentally safe septic systems and soakaways.
More on Soakaways
For more information and guidance on Installing or investigating your soakaway, click below:
If you found DrainHub useful or have any feedback please let us know! Reviews on TrustPilot are appreciated and helps us to tailor our site to improve and help more people!
Having spent almost 20 years in the UK drainage industry, I thought it was about time I put what I’ve learned to good use.
Many people have asked how they can deal with drainage problems themselves before having to call someone out, or expressed interest in how something works, such as equipment used or an aspect of their drains, so I made http://drainhub.uk to answer those questions and help people at a DIY level.
As soon as the sinks were tested and the floor drain (gully) started to back up, it was clear from visible grease that this would take more than a simple plunge to get it going. Luckily, our jetting hose could reach from the back door, so we were able to use high pressure water jetting…
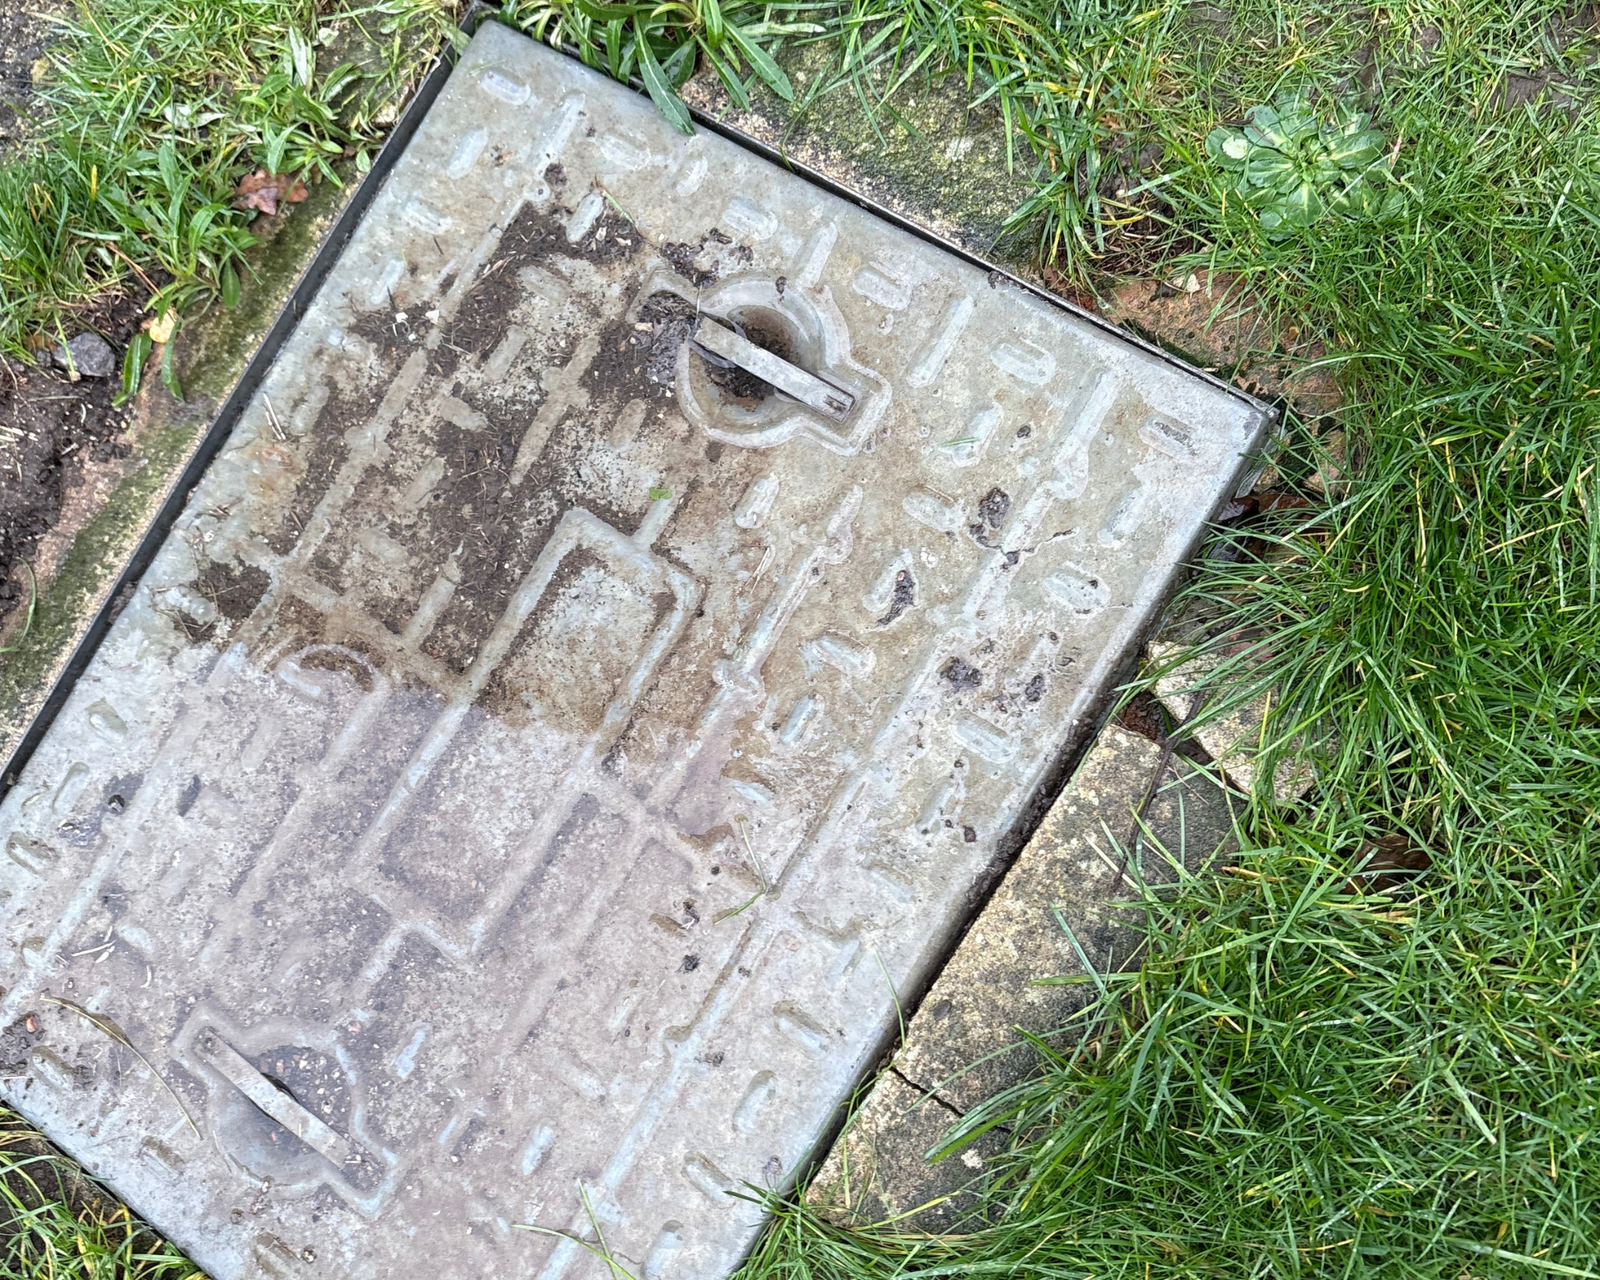
Manhole Cover Replacement in Oxfordshire We don’t just unblock drains, we make sure your property is left safe and in good condition. Sometimes we come across broken or damaged manhole covers, which if left alone can become bigger problems in the future – in particular they can be prime trip or fall hazards and even…
Thame is a traditional Oxfordshire market town with a busy high street, expanding housing developments, and thriving business areas. Blocked drains or manhole cover problems here can affect both homes and businesses — and DrainHub is your local solution. 🏠 Residential Drain Services in Thame We provide: 🏢 Commercial & Industrial Drain Services We support:…
Leave a Reply