If you decide a new soakaway is needed for your property; or maybe you have been asked about installing one for someone else, here are some quick pointers before we get started.
As with most things, there are pros and cons to installing a soakaway yourself or paying a contractor to do it for you…
Costs may be a factor in deciding as well as your confidence and competency in these kinds of tasks.
How Do Soakaway Crates Work?
Here are concise steps to installing a crate system:
- Excavation: Dig a pit to the required dimensions based on the calculated capacity needed for water runoff.
- Base Preparation: Level and compact the base of the pit. Optionally, add a layer of sand or fine gravel for stability.
- Geotextile Layer: Line the pit with a permeable geotextile fabric to prevent soil ingress and to enhance filtration.
- Assembly: Place the soakaway crates in the pit, connecting them according to the manufacturer’s instructions to form a stable structure.
- Wrapping: Completely wrap the assembled crates with the geotextile fabric to encase them and prevent soil from entering.
- Backfilling: Cover the wrapped crates with a layer of soil, ensuring that there’s enough depth to support any surfacing above, like grass or paving.
- Connection: Connect the output from the drainage system (e.g., downpipes from gutters) to the soakaway crates using PVC pipes or flexible connectors.
How these soakaways work:
- Rain Collection: Rainwater is collected from roofs, gutters and sometimes gullies & channel drains.
- Transport: It is then directed through downpipes to the soakaway system.
- Storage: The water enters the crates, where it is temporarily stored.
- Percolation: Slowly, water percolates through the geotextile and into the surrounding soil, dispersing naturally into the ground.
This system effectively manages rainwater, reducing the risk of surface flooding and waterlogging.
How Much Does it Cost to Install a Soakaway?
This is difficult to answer at first glance due to many factors from location, size of the soakaway needed and costs of plant and materials.
But as a rough guide, you may find the following helpful:
Plant Hire & Tools
- 0.8 Tonne Excavator £100-£250
- Skip Hire – depending on size of project
- Cat & Gennie (if appropriate)
- Spades and Shovels
Materials
- Soakaway Crate(s)190L per unit £100-£150
- Membrane £20-£40
- Pipe and Connectors £30-£90, depending on length and bends
- 10mm Gravel £30-£60 depending on quantity
- Cement and aggregates £30-£60
- Top Soil & Grass Seed £20
Remember this is a rough estimate and this is assuming no inspection chamber is needed and you already have down pipes and surface features such as rain water gullies and channel drainage ready to connect to your new soakaway.
Table of Contents
Here are concise steps to installing a crate system:
This system effectively manages rainwater, reducing the risk of surface flooding and waterlogging.
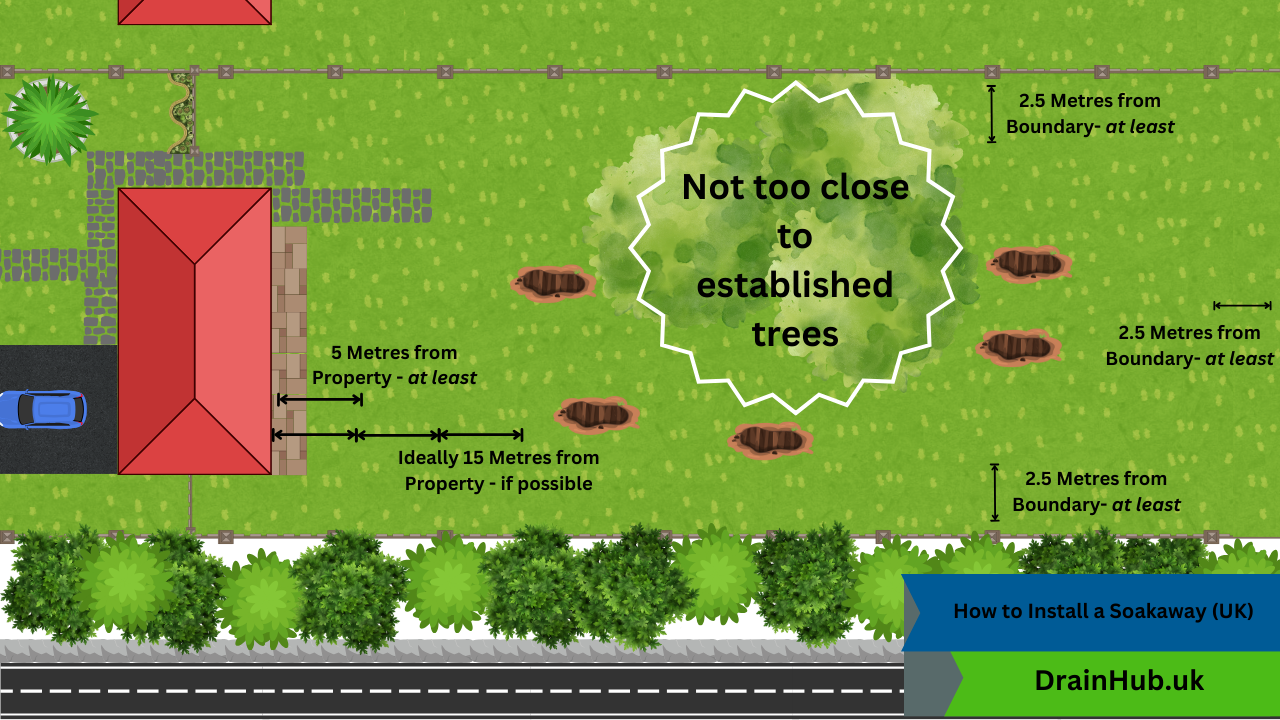
Site Assessment for a Soakaway

When checking for services, look for other drains such as waste inspection chambers, kitchen gullies, water stopcocks, and make a note of how electricity comes into the property, from above or below?
For piece of mind, I would recommend using a Cat & Gennie when digging for this kind of project, even if you’re doing it for yourself.
Assuming you have an idea of services you could encounter, and have an idea of where you want the new soakaway to go, let’s move on to Percolation Tests…
A percolation test is pretty much digging a trial hole, filling it with water, and measuring how long it takes to drain.
Check out Percolation tests here for more detail:
Now, assuming your Percolation tests have been successful, there are no services in the way and there isn’t too much clay interfering with your chosen area, you can begin prepping for your new soakaway…
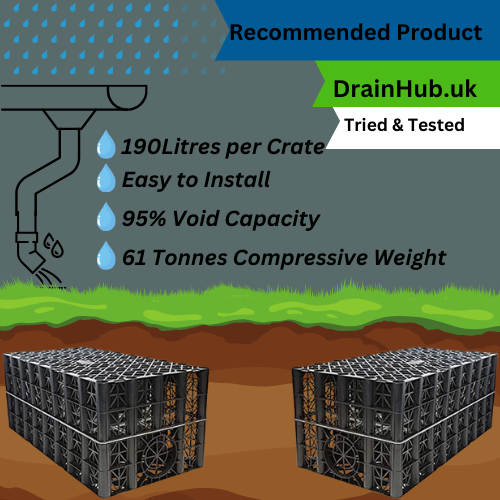
There are many Soakaway crates on the market, and you don’t even need to use a crate if you’re not too fussed about longevity – you could just use plain old gravel in the ground.
However, just to give the most ideal advice in terms of best practice and ideal design, a crate system I’ve used before is my recommended product.
I’ve used these crates to install small and medium sized soakaways between 1-4 crates in size.
For more info, specs and where to buy, check out our Polystorm Soakaway Crate system below:
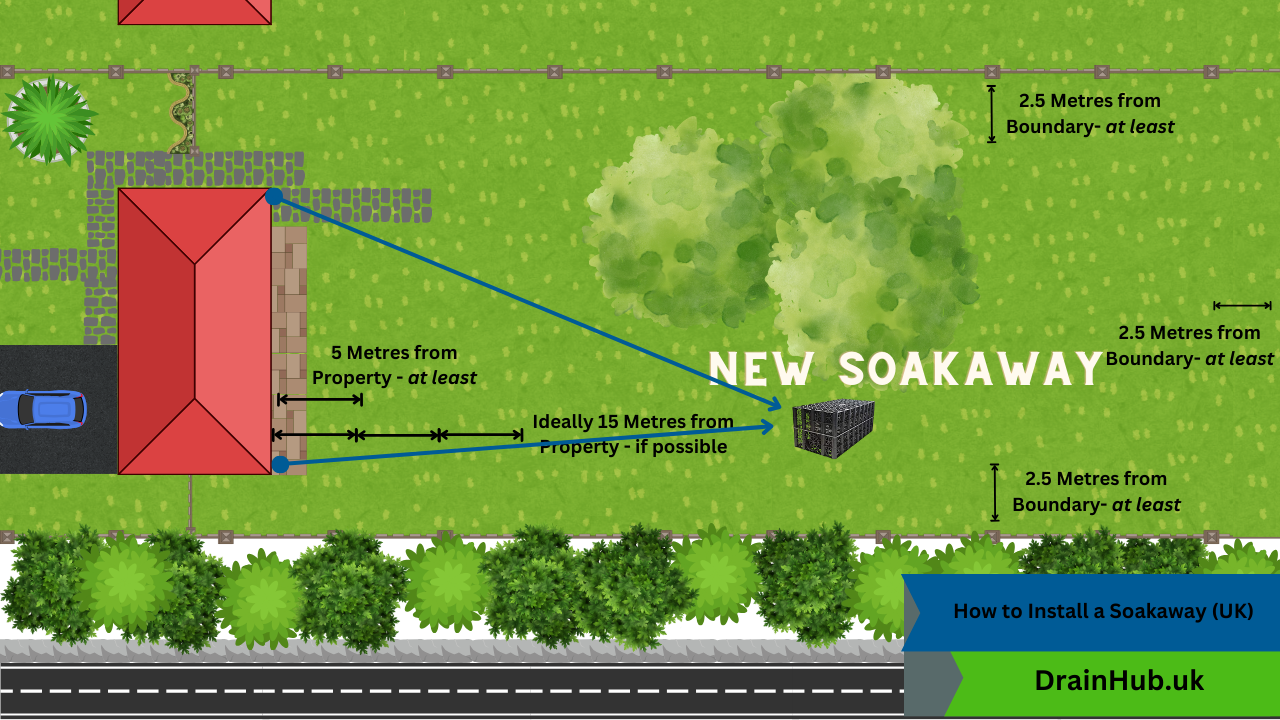
Let’s assume we’re good to go, and base our installation on the following image:

How to Calculate Volume needed for a New Soakaway
Feel free to use our DrainHub Soakaway calculator to assist you with working out how large or how many crates your soakaway needs to be:

Soakaway Volume Calculator
Design and Materials for your New Soakaway
The reason I’ve picked the Polystorm Soakaway kit is because it’s a relatively simple product to use for most domestic and even some commercial applications. Rather than giving half a dozen products and as many variations of a soakaway, this just works.
Why use a Crate System Vs a Traditional Gravel or Shingle Soakaway?
The most obvious advantage to using crates is sheer capacity, as they offer up to 95% void capacity compared to a load of shingle in the ground, which is as low as 30% capacity.
You will also likely find that modular crates are more cost effective overall, and easier to work out sizes than ordering bulk aggregates.

Here are some more comparisons:
Soakaway Crates
- Structure:
Modular and lightweight plastic crates. - Installation:
Quick and easy to install due to their prefabricated nature. - Efficiency:
High void ratio (up to 95%), which means more water can be stored per cubic meter compared to aggregate. - Maintenance:
Generally lower maintenance as they are less prone to siltation. - Cost:
Initial cost can be higher than aggregate, but often cost-effective in the long term due to reduced excavation and fill requirements. - Space:
More effective in areas with limited space as they provide greater water storage capacity in a smaller volume. - Environmental Impact:
Less impact during construction since less soil excavation and displacement are involved. - Durability:
Long-lasting and less prone to collapse compared to aggregate systems.
Traditional Aggregate Soakaways
- Structure: Made using layers of gravel or crushed stone.
- Installation: More labor-intensive and time-consuming as it involves extensive digging and filling.
- Efficiency: Lower void ratio (around 30-40%), meaning they hold less water per cubic meter.
- Maintenance: Higher maintenance required to prevent blockage from silt and debris.
- Cost: Typically lower initial material cost but may incur higher labor costs and longer installation time.
- Space: Requires more space to achieve equivalent water handling capacity to crates.
- Environmental Impact: Higher due to significant ground excavation and potential for more waste material.
- Durability: Risk of compaction and clogging over time, which can reduce effectiveness and lifespan.
In choosing between the two, the decision often depends on specific site conditions, local regulations, and budget considerations.
By thoroughly planning and selecting the appropriate design and materials, you lay a strong foundation for a successful soakaway installation that will manage water runoff efficiently and last for years to come.
Always refer to the manufacturer’s guidelines and local building codes to ensure compliance and optimal performance.
Designing Your Soakaway
This is as simple as running your downpipes and surfaae drainage to your new soakaway, but it can become complex if not planned.
Here are some notes to help you plan:
- Make sure you account for volume from your roof surface area, using the calculator at the top of the page.
- Check for any visible utilities that may be present, including where services come into the property and any scars on hard surfaces – such as concrete or tarmac.
- Plan how you introduce rain water into the soakaway.
Generally they have one inlet but you can combine downpipes and other connections underground with T and Y connectors. - Plan how much fall you need, so you have enough gradient from start to finish. Building your soakaway at the lowest point will help with this.
What Materials You Need For Your Soakaway
There aren’t many components to a soakaway, but the quantity depends on the complexity, length and size of your soakaway project.
- 110mm UPVC Underground Waste Pipe
- 1110mm UPVC Connectors and Bends
- 110mm Waste Pipe Adapators, if Connecting to Clay
- 10mm Shingle for bedding in pipe
- Soakaway Crate(s)
- Membrane
How To Build Your Soakaway
Excavation
Mark out the area based on the crate dimensions and dig to the required depth, allowing extra space for the geotextile wrap.
Dig deep enough water easily flows from upstream to soakaway, wide enough for bedding your underground pipe in plenty of 10mm shingle.
Preparation of Base
Lay a level bed of sand or fine gravel at the bottom of the excavation to support the crates.
If you don’t have an “elephant’s foot” or similar for compacting the base, a sledgehammer or your excavator’s bucket may do the trick (unless you hand dug, in which case you’ll probably need a coffee about now).
Crate Assembly
Assemble the crates according to the manufacturer’s instructions, securing them with the provided clips and shear connectors.
Wrapping the Crates
Wrap the assembled crates with the geotextile membrane to prevent soil ingress while allowing water to filter through. I find taping the seam at the top to be the easiest way to keep it wrapped until it’s backfilled.
Final Inspection and Covering
Once backfilling is complete, a final inspection is a good idea, to ensure the integrity and correct installation of the soakaway. Check that all connections to the stormwater drainage system are secure and watertight to prevent leaks or blockages.
Final Checks on Your New Soakaway
Make sure the membrane or geotextile wrapping is properly sealed around the inlet pipe and the overlap where you wrapped it.
This is to make sure soil and other solids cannot enter the crates, which would compromise it from the start and reduce the lifespan and efficiency of the product.
Make sure the crates are aligned properly and when you backfill the sides, that it’s done evenly and carefully. Compact the backfill every so often to avoid it settling differently around the edges of the crates – this could distort them in the future.
When you backfill to the top of the crates, the final layer of soil should be laid carefully.
You do not want to compress the soil directly above the crates, as this could potentially reduce the void space within the crates and reduce the maximum storage capacity.
It shouldn’t be likely but not worth the risk.
When you re-lay the surface, if it’s grass, I tend to use some grass seed even if the turf I saved goes back reasonably well, just for piece of mind.
Over the next few days, check the area for sinking or pooling water, as you may have to top it up with fresh soil where it has settled.
Keep notes and plenty of photographs of each stage, especially the end result, as this could come in handy for future maintenance, and if you end up selling the property or it changes hands, you have valuable records to show compliance and that the property has a decent means of getting rid of rain water.
If the area takes any kind of vehicle traffic, such as parking spaces or driveway, it could be worth placing a protective layer over the soakaway in the form of concrete slabs or paving stones, just to spread the weight across the top and not directly onto the crates.
The crates are rated for a lot of tonnage but there’s no harm in reducing the load on to them if it means your new soakaway is taking less strain.
Leave a Reply